
Overhauling the gear set on a Jaguar E-Type Series III V12 is a complex task that requires mechanical expertise. click here for more details on the download manual…..
- Test Drive – 1973 Jaguar E-Type Series III V12 Coupe! This is a stunning 1973 Jaguar XKE Coupe that has been in California and Arizona with a mere 40600 miles travelled since new.
- Jaguar E-type series 3 V12 straight piped ! 5 speed tremec conversion . Friends resto mod straight piped v12 series 3 , 2 plus 2 E-type RHD.. fully built engine .. I drove this car and it really does sound …
Below is a reverse order guide to help you understand the steps involved in this process. Please make sure to follow safety precautions and consult a service manual for detailed specifications and torque settings.
### 6. Reassemble the Differential
– **Install the Differential Cover**: Use a new gasket and torque bolts to the specified settings.
– **Reattach the Driveshaft**: Align the driveshaft with the differential and secure it.
– **Reinstall the Brake Hubs and Wheels**: Put the brake components back in place and torque the wheel nuts.
### 5. Final Adjustments
– **Check Gear Mesh**: Verify the gear mesh pattern using a marking compound.
– **Set Backlash**: Measure the backlash and adjust as necessary by modifying shims.
– **Lubricate**: Fill the differential with the appropriate gear oil.
### 4. Install the Ring and Pinion
– **Install the Pinion Gear**: Place the pinion gear into the housing, ensuring the proper preload is set with shims.
– **Install the Ring Gear**: Attach the ring gear to the differential casing, ensuring proper alignment with the pinion.
– **Check Preload and Backlash**: Ensure both are set to manufacturer specifications.
### 3. Rebuild the Differential Assembly
– **Disassemble the Differential**: Remove the old bearings and seals from the differential case.
– **Replace Bearings**: Install new bearings and seals, ensuring they are properly seated.
– **Install the Spider Gears**: Reassemble the differential with new spider gears if necessary.
### 2. Remove the Old Gear Set
– **Remove the Differential from the Car**: Disconnect the suspension components and remove the differential from the vehicle.
– **Disassemble the Differential**: Take apart the differential to access the ring and pinion gear set.
### 1. Preparation and Safety
– **Gather Tools and Parts**: Ensure you have all necessary tools (socket set, torque wrench, bearing puller, etc.) and replacement parts.
– **Safety Precautions**: Wear safety glasses and gloves. Make sure the vehicle is securely supported on jack stands.
### Additional Considerations
– **Documentation**: Keep a detailed record of all settings and adjustments made during the process.
– **Consult the Manual**: Refer to the Jaguar service manual for specific torque values and part numbers.
– **Test Drive**: After reassembly, perform a test drive to ensure everything is functioning correctly.
This reverse order guide provides a framework for overhauling the gear set on a Jaguar E-Type Series III V12. However, it is essential to have a comprehensive unders tanding of the vehicle and its components before attempting such a task.
The mass airflow sensor (MAF sensor) is a critical component in modern internal combustion engines, playing a vital role in the vehicle’s engine management system. It is responsible for measuring the amount of air entering the engine, which is essential for the engine control unit (ECU) to calculate the appropriate fuel injection needed for optimal combustion. This precise measurement ensures that the engine operates efficiently, maximizes power output, and minimizes emissions.
Typically located in the intake system, between the air filter and the throttle body, the MAF sensor can come in various designs, most commonly as a hot Wire or a vane type. In a hot Wire MAF sensor, a thin Wire is heated to a specific temperature, and as air flows over it, the Wire cools down. The ECU measures the amount of current required to maintain the wire’s temperature, which correlates to the mass of the incoming air. Vane-type sensors use a movable vane that deflects according to the airflow, providing a mechanical measurement of air volume.
A malfunctioning MAF sensor can lead to a host of engine performance issues, including poor fuel economy, rough idling, stalling, and increased emissions. Common symptoms of a faulty MAF sensor include a check engine light, hesitation during acceleration, and difficulty starting the engine. Regular maintenance and timely replacement of this component are crucial for ensuring the smooth operation of the vehicle’s engine.

 and safety instructions.

 tanding of its components and some troubleshooting skills.
 and crank the engine. Record the compression readings for
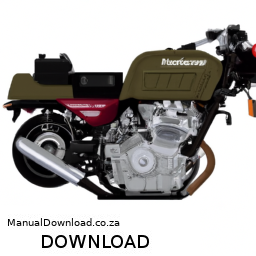
 and detailed diagrams
 and torque specifications.
 and secure it with the bolts. Tighten
 and in place, including any electrical connections.
 and secure it with screws or bolts, tightening them to the manufacturer’s specifications using a torque wrench.