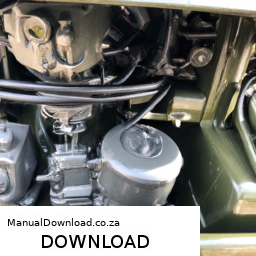
Replacing the pressure plate on a Willys Overland M38 MC engine 4×4 can seem daunting, but with some basic mechanical understanding and following step-by-step instructions, you can do it. click here for more details on the download manual…..
- Willys jeep m38 #4×4 #thar #jeep #jeeplife #automobile #willys #willysjeep #willysoverland
- 1952 Willys M38 1/4 Ton 4×4 Canadian military Vehicle walkaround In 1950, Willys introduced the M-38 (identified as an “MC” by Willys), a post-WWII Jeep based on the CJ-3A and fitted will …
Here’s a simplified guide to help you through the process:
### Tools and Materials Needed:
– **Basic hand tools**: Wrenches, sockets, ratchet, screwdrivers, pliers
– **Torque wrench**
– **Jack and jack stands**: To lift and secure the vehicle
– **Flywheel cleaner**: To clean the flywheel surface
– **New pressure plate and clutch disc**: Make sure they’re compatible with your M38
– **Clutch alignment tool**: To help center the new clutch disc
### Step-by-Step Guide:
#### 1. **Prepare the Vehicle**
– **Safety First**: Park the vehicle on a flat surface and engage the parking brake.
– **Disconnect the Battery**: Remove the negative terminal of the battery to avoid any electrical issues.
#### 2. **Lift the Vehicle**
– Use a jack to lift the front or rear of the vehicle, depending on where you have access to the transmission. Secure it with jack stands.
#### 3. **Remove the Transmission**
– **Access the Transmission**: You may need to remove the driveshaft (if applicable) By unbolting it from the differential and transmission.
– **Unbolt the Transmission**: Locate the bolts that secure the transmission to the engine. Remove these bolts carefully. You might need to support the transmission with a jack or transmission jack.
– **Separate the Transmission**: Gently pull the transmission away from the engine. Be careful not to damage any connecting wires or lines.
#### 4. **Remove the Old Pressure Plate**
– **Access the Flywheel**: Once the transmission is off, you will see the flywheel and clutch assembly.
– **Remove the Pressure Plate Bolts**: There are typically several bolts securing the pressure plate to the flywheel. Use a wrench or socket to remove these bolts.
– **Take Off the Pressure Plate**: Carefully lift the pressure plate away from the flywheel. Take note of how the clutch disc is positioned.
#### 5. **Inspect and Clean Components**
– **Check the Flywheel**: Inspect the flywheel for cracks or damage. Clean the surface with a flywheel cleaner to remove any debris or oil.
– **Check the clutch Disc**: Inspect the clutch disc for wear. If it looks worn or damaged, consider replacing it as well.
#### 6. **Install the New Pressure Plate**
– **Position the New clutch Disc**: If you’re replacing the clutch disc, use the clutch alignment tool to position it correctly on the flywheel.
– **Install the New Pressure Plate**: Align the new pressure plate with the clutch disc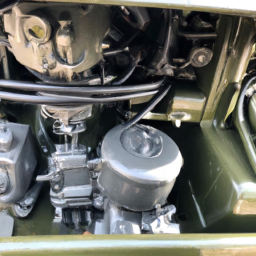 and flywheel. Replace and hand-tighten the bolts that secure it to the flywheel.
– **Torque the Bolts**: Use a torque wrench to tighten the pressure plate bolts to the manufacturer’s specified torque setting (check your service manual for this).
#### 7. **Reattach the Transmission**
– **Align the Transmission**: Carefully slide the transmission back into place, ensuring it aligns correctly with the engine and the new pressure plate.
– **Bolt the Transmission Back**: Replace all the bolts that hold the transmission to the engine.
– **Reattach the Driveshaft**: If you removed the driveshaft, reattach it now.
#### 8. **Reconnect Everything**
– **Reconnect Wires and Lines**: Ensure any wires or lines that were disconnected are reattached.
– **Reconnect the Battery**: Attach the negative terminal back on the battery.
#### 9. **Lower the Vehicle and Test**
– **Remove the Jack Stands**: lower the vehicle back to the ground.
– **Test the Clutch**: Start the engine and test the clutch to ensure it engages and disengages smoothly.
### Final Tips:
– Take your time and don’t rush through the process.
– If you’re unsure about any step, refer to a repair manual specific to the Willys M38 or consult with a professional mechanic.
– Keep your work area organized to avoid losing any small parts.
Replacing the pressure plate can be a rewarding experience, and with patience and attention to detail, you can successfully complete the job!
The rack and pinion system is a fundamental component of a vehicle’s steering mechanism, playing a crucial role in translating the rotational motion of the steering wheel into the linear motion needed to turn the wheels. This system consists of two primary parts: the rack, which is a linear gear, and the pinion, which is a small cylindrical gear that meshes with the rack. When the driver turns the steering wheel, the pinion rotates, engaging the teeth of the rack. As the pinion turns, it moves the rack side to side, allowing the front wheels to pivot in the desired direction.
One of the key advantages of the rack and pinion system is its direct and efficient response to steering inputs. Unlike older steering systems that relied on a series of linkages and gears, rack and pinion setups provide a more compact design, reducing weight and complexity. This leads to better feedback and improved handling characteristics, enhancing the overall driving experience. Additionally, rack and pinion systems can be easily adapted for power steering, where hydraulic or electric assist is integrated to reduce the effort required By the driver to turn the wheel, particularly at low speeds.
Overall, the rack and pinion steering mechanism is essential for modern vehicles, ensuring precise control and responsiveness, contributing to both safety and performance on the road.
Replacing the shock absorbers on a Willys Overland M38 with a manual 4×4 and an MC engine requires attention to detail and proper tools. Here are the main components and steps involved in the process:
### Main Components:
1. **Shock Absorbers**: The primary components being replaced. Ensure you have the correct replacement shocks that match the specifications for the M38.
2. **Mounting Brackets**: These are the brackets that secure the shock absorbers to the vehicle’s frame and suspension components. Inspect them for wear or damage and replace if necessary.
3. **Bushings**: Rubber or polyurethane bushings are often used to cushion the shock absorber mounts. Check the condition of these bushings and replace them if they are cracked or worn.
4. **Bolts and Fasteners**: The bolts that hold the shock absorbers in place. Ensure you have the correct size and grade of replacement bolts, including lock washers if required.
5. **Tools**: Basic hand tools are needed, including:
– Socket set
– Wrenches (including a torque wrench for proper tightening)
– Pliers
– Jack and jack stands for vehicle support
– Possibly a spring compressor if the suspension needs to be compressed for access.
### Steps to Replace Shock Absorbers:
1. **Safety First**: Park the vehicle on a flat surface and engage the parking brake. Use jack stands to secure the vehicle after raising it with a jack.
2. **Remove Old Shock Absorbers**:
– Locate the top and bottom mounting points of the shock absorber.
– Use the appropriate socket or wrench to remove the bolts holding the shock in place. You may need to support the axle or control arm with a jack to relieve tension on the shock.
3. **Inspect Components**: As you remove the old shocks, inspect the mounting brackets and bushings for excessive wear or damage. Replace these components as necessary.
4. **Install New Shock Absorbers**:
– Position the new shock absorber in place, aligning it with the mounting brackets.
– Insert the bolts and hand-tighten them to hold the shock in place.
5. **Torque to Specifications**: Use a torque wrench to tighten the bolts to the manufacturer’s specifications, ensuring they are secure without over-tightening.
6. **Repeat for All Shock Absorbers**: If replacing all four shocks, repeat the process for each one.
7. **Final Checks**: Once all shocks are installed, double-check the tightness of all bolts and ensure everything is properly aligned.
8. **Lower the Vehicle**: Carefully remove the jack stands and lower the vehicle back to the ground.
9. **Test Drive**: Take the vehicle for a short test drive to ensure the new shocks are functioning correctly and there are no unusual noises.
### Conclusion:
Replacing the shock absorbers on a Willys Overland M38 is a straightforward process but requires careful attention to detail and safety. Always refer to the specific vehicle service manual for torque specifications and additional guidance tailored to your specific model.