Download 2011 OPEL ASTRA Classic III Service and Repair Manual –

discount
– **Gather Necessary Tools and Materials**: – **New Battery**: Ensure you have the correct battery type that fits your OPEL ASTRA Classic III. click here for more details on the download manual…..


    Opel astra g 1.4 16V exhaust

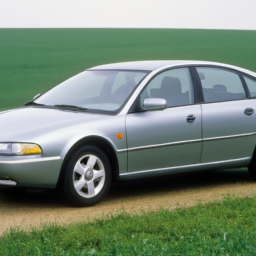
    Opel Astra Classic III A16XER Exterior and Interior Outside and inside view of Opel Astra Classic III A16XER car. The car is with 1598 cm³ engine, benzine, 85 kW, 115 hp.

– **Gather Necessary Tools and Materials**:
– **New Battery**: Ensure you have the correct battery type that fits your OPEL ASTRA Classic III. Check the owner’s manual for specifications.
– **Wrenches/Sockets**: A set of wrenches or sockets (usually 10mm) to remove the battery terminals and hold-down clamp.
– **Safety Gloves**: To protect your hands from any corrosive materials.
– **Safety Goggles**: To shield your eyes from potential battery acid.
– **Battery terminal Cleaner**: Optional, for cleaning any corrosion on the terminals.
– **Multimeter**: Optional, to check the voltage of the old battery before removal.

– **Prepare the Vehicle**:
– Ensure the vehicle is parked on a flat surface and turned off.
– Remove the key from the ignition to prevent any electrical shorts.

– **Open the Hood**:
– Locate the hood release lever inside the vehicle, usually near the driver’s side footwell.
– Pull the lever to release the hood latch, then lift the hood and secure it with the prop rod.

– **Locate the Battery**:
– Identify the battery position, typically situated on the driver’s side of the engine bay.

– **Disconnect the Battery**:
– **Negative terminal First**: Use the appropriate wrench/socket to loosen the nut on the negative terminal (marked with a “-” sign). Remove the cable and tuck it away to prevent accidental reconnection.
– **Positive Terminal**: Repeat the process for the positive terminal (marked with a “+” sign). Ensure both terminals are safely disconnected.

– **Remove the Battery Hold-Down**:
– Look for a battery hold-down bracket or clamp that secures the battery in place.
– Use the appropriate wrench/socket to remove the bolts or nuts securing the hold-down. Keep these fasteners in a safe place for reinstallation.

– **Extract the Old Battery**:
– Carefully lift the battery out of its tray. Batteries can be heavy, so use caution and proper lifting techniques to avoid injury.

– **Clean the Battery Tray and Terminals**:
– Inspect the battery tray for any corrosion or debris. Clean it with a cloth or a battery terminal cleaner if necessary.
– Check the battery terminals for corrosion. If present, clean them with a wire brush or terminal cleaner.

– **Install the New Battery**:
– Place the new battery into the battery tray, ensuring it sits securely in place.
– Reinstall the hold-down bracket or clamp, tightening the fasteners securely.

– **Reconnect the Battery**:
– **Positive terminal First**: Start by connecting the positive terminal. Place the cable over the positive terminaldownload OPEL ASTRA Classic III workshop manual and tighten the nut until secure.
– **Negative Terminal**: Connect the negative terminal in the same manner. Ensure both connections are snug but be careful not to overtighten.

– **Check Functionality**:
– Before closing the hood, check that all electrical components function properly. Start the vehicle and make sure everything is working as expected.

– **Close the Hood**:
– Lower the hood gently and ensure it’s securely latched.

– **Dispose of the Old Battery**:
take the old battery to a recycling center or an auto parts store that accepts used batteries. Proper disposal is crucial due to the hazardous materials contained in batteries.

By following these steps, you will successfully replace the battery in your OPEL ASTRA Classic III while ensuring safety and proper handling.
Keyless entry is an automotive feature that allows drivers to unlock and start their vehicles without the need for a traditional physical key. this convenience-enhancing technology utilizes a combination of radio frequency identification (RFID) and wireless communication to facilitate access to the vehicle. Typically, the system comprises a key fob, which is a small electronic device that communicates with sensors installed in the car.

When the driver approaches the vehicle with the key fob in their possession, the sensors detect the presence of the fob. this initiates a signal that unlocks the doors automatically, allowing for seamless entry. In many systems, the driver can simply touch a designated area on the door handle to unlock the vehicle without even needing to press a button on the fob. Moreover, once inside, starting the engine is often as simple as pressing a button, provided the key fob is within the vehicle.

Keyless entry systems enhance security by reducing the risk of lock picking or unauthorized access, as the vehicle will only respond to the specific key fob it recognizes. Additionally, many modern vehicles equipped with keyless entry also feature advanced security measures, such as rolling codes, which change the access signal each time the fob is used. this technology not only adds convenience but also contributes to a more modern driving experience by integrating seamlessly with other smart features in today’s vehicles.

Download OPEL OMEGA B 1994-2003 Workshop Service Repair Manual –

workshop manual
Replacing the heater core in an Opel Omega B can be a challenging task, especially for someone with little mechanical experience. click here for more details on the download manual…..


    Omega B 2.2 Tuning by RVD Garage

    Opel Omega B – Check For These Issues Before Buying What problems await you after buying a used Opel Omega B 1994 2003. The Opel Omega B is a large family car that was in …

However, with patience and a clear understanding of the steps involved, you can accomplish this task. Here’s a simple guide to help you through the process.

### Tools and Materials Needed:
– Screwdrivers (flathead and Phillips)
– Socket set and ratchet
– Pliers
– A container to catch coolant
– New heater core
– New coolant
– Towels or rags
– Safety glasses and gloves

### Step-by-Step Guide:

#### 1. **Preparation:**
– **Safety First:** Ensure the car is parked on a level surface, turn off the ignition, and engage the parking brake. Wear safety glasses and gloves.
– **Disconnect the Battery:** To avoid any electrical issues, disconnect the negative terminal of the battery.

#### 2. **Drain the Coolant:**
– Locate the radiator drain valve (usually at the bottom of the radiator) and place a container underneath it.
– Open the valve to let the coolant drain out. Be careful as the coolant can be hot. Close the valve when finished.

#### 3. **Remove Dashboard Components:**
– **Remove the Center Console:** You may need to take out screws and clips holding the center console in place. Carefully lift it out and set it aside.
– **Take Out the Dashboard:** This step can be complex. Look for screws and bolts securing the dashboard, especially around the instrument panel and glove compartment. Disconnect any electrical connectors as you go. Note where everything goes for reassembly.

#### 4. **Access the Heater Core:**
– Once the dashboard is removed, you should see the heater box, which contains the heater core.
– Locate the heater core hoses at the firewall (the wall between the engine bay and the cabin).

#### 5. **Disconnect the Heater Core Hoses:**
– Use pliers to loosen the clamps on the heater core hoses and carefully slide them off. Be prepared for any remaining coolant to spill out, so have your container ready.

#### 6. **Remove the Heater Core:**
– Find any screws or bolts securing the heater core to the heater box. Remove them carefully.
– Gently pull the heater core out of the heater box. Be cautious not to damage any surrounding components.

#### 7. **Install the New Heater Core:**
– Take your new heater core and insert it into the heater box, ensuring it fits snugly.
– Reattach any screws or bolts you removed earlier to secure it in place.

#### 8. **Reconnect the Heater Core Hoses:**
– Slide the hoses back onto the heater core and tighten the clamps securely.

#### 9. **Reassemble the Dashboard:**
– Carefully put the dashboard back in place, reconnecting all electrical connectors and securing it with screws and bolts.
– Reinstall the center console.

#### 10. **Refill the Coolant:**
– Open the radiator cap and refill the cooling system with new coolant. Make sure to check the owner’s manual for the correct type and mixture.
– Start the engine and let it run for a few minutes, allowing the coolant to circulate. Check for leaks around the heater core hoses.

#### 11. **Reconnect the Battery:**
– Once everything is back in place, reconnect the negative terminal of the battery.

### Final Steps:
– **Test the System:** Turn on the heater to ensure hot air is coming outdownload OPEL OMEGA B workshop manual and check for any leaks.
– **Clean Up:** Dispose of any old coolant properly and clean up any spills.

### Important Tips:
– Take pictures during disassembly to help with reassembly.
– Be patient and don’t rush the process.
– If you’re unsure about any step, consider consulting a professional mechanic or referring to a repair manual specific to the Opel Omega B.

With careful attention to detail, you should be able to successfully replace the heater core in your Opel Omega B. Good luck!
The heater control valve is a crucial component of a vehicle’s heating and cooling system, primarily responsible for regulating the flow of coolant from the engine to the vehicle’s heater core. Located typically within the engine bay or the dashboard area, this valve plays a vital role in maintaining the desired cabin temperature by controlling the amount of hot coolant that enters the heater core, which in turn heats the air that is blown into the passenger compartment.

When the vehicle’s heating system is activated, the heater control valve opens to allow hot coolant to flow through the heater core. The heat from the coolant is then transferred to the air passing through the core, warming it before it is distributed throughout the cabin via the vehicle’s ventilation system. Conversely, when the heating system is turned off or adjusted to a cooler setting, the valve closes or restricts coolant flow, preventing hot coolant from entering the heater core, thereby maintaining a comfortable temperature for the occupants.

Modern vehicles often utilize electronically controlled heater control valves that are integrated with the climate control system, allowing for more precise temperature management and improved fuel efficiency. A malfunctioning heater control valve can lead to insufficient cabin heating, overheating of the engine, or coolant leaks, making it essential for optimal vehicle performance and passenger comfort. Regular maintenance and timely inspections can help ensure the heater control valve functions correctly, contributing to a reliable and enjoyable driving experience.

Download 2007 OPEL ASTRA FAMILY Service and Repair Manual –

owners manual
Repairing a planetary gear system in an Opel Astra Family involves a variety of tools and equipment. click here for more details on the download manual…..


    Used Car Review: Vauxhall Astra The Vauxhall Astra might not have the most glamorous reputation, but it has always offered excellent value for money whether …

    bodgit and leggit garage opel astra how to do timing belt (part 5) business and permissions inquires bodgitandleggit@gmail.com https://www.patreon.com/Bodgitandleggitgarage …

Below is a detailed guide along with the necessary tools for the repair process:

### Tools and Equipment Needed

– **Socket Set**
– A complete socket set (including metric sizes) allows you to remove various bolts and nuts from the transmission and related components.

– **Wrenches**
– A set of open-end and box-end wrenches is essential for loosening and tightening bolts in tight spaces.

– **Torque Wrench**
– Necessary for applying the correct torque specifications when reassembling components to ensure everything is secure without over-tightening.

– **Pliers**
– A variety of pliers (needle nose, slip-joint) are useful for gripping, twisting, and pulling components apart.

– **Screwdrivers**
– Both Phillips and flathead screwdrivers will be needed for removing screws and clips in the assembly.

– **Gear Puller**
– A gear puller is crucial for removing gears from the shaft without causing damage to either the gear or the shaft.

– **Shop Press**
– If any components need to be pressed apart or fitted, a hydraulic shop press is necessary for providing the required force.

– **Cleaning Supplies**
– Degreaser, rags, and brushes are important for cleaning parts and removing old grease or oil before reassembly.

– **New Bearings and Seals**
– Depending on the condition of the planetary gear assembly, new bearings and seals will likely be required to ensure proper functioning.

– **Gasket Maker or OEM Gasket**
– For sealing parts together, use a high-quality gasket maker or an OEM gasket to prevent leaks.

– **Oil or Transmission Fluid**
– Make sure to have the correct type of oil or transmission fluid to refill the system after repairs.

### Repair Process

– **Preparation**
– Gather all necessary tools and materials.
– Ensure you have a clean working environment with adequate lighting and space.

– **Remove the Transmission**
– Disconnect the battery to prevent electrical shorts.
– Lift the car using a Jack and secure it with Jack stands.
– Remove the wheels and any underbody panels for access.
– Disconnect the driveshafts, cables, and lines connected to the transmission.
– Remove the bolts securing the transmission to the engine and carefully slide it out.

– **Disassemble the Transmission**
– Place the transmission on a clean workbench.
– Remove the transmission case bolts using a socket set to separate the housing.
– Carefully lift off the top half of the transmission case to access the internal components.

– **Inspect the Planetary Gear Assembly**
– Take out the planetary gear assembly and inspect all components, including the sun gear, planet gears, and ring gear for wear or damage.
– Check bearings and seals for any signs of wear or failure.

– **Replace Damaged Components**
– If any gears or bearings are damaged, replace them with new parts.
– Use a gear puller if necessary to remove old gears from shafts.

– **Clean All Parts**
– Thoroughly clean all components with degreaserdownload OPEL ASTRA FAMILY workshop manual and rags to remove old oil and debris.
– Inspect the transmission case for any cracks or damage.

– **Reassemble the Planetary Gear Assembly**
– Reinstall the planetary gear assembly in the correct order, ensuring all gears fit properly.
– Apply new grease to bearings and gears as specified in repair manuals.

– **Reinstall the Transmission**
– Carefully place the transmission back onto the engine, ensuring alignment with the torque converter and engine block.
– Secure all bolts and connections, ensuring to follow the manufacturer’s torque specifications.

– **Reconnect All Components**
– Reattach the driveshafts, cables, and any lines that were disconnected.
– Reinstall any underbody panels and wheels.

– **Refill with Oil**
– Refill the transmission with the correct type and amount of transmission fluid or oil as specified in the Opel Astra manual.

– **Testing**
– Reconnect the battery and start the vehicle.
– Check for any leaks and ensure smooth operation of the transmission through all gears.

### Final Notes

– **Safety Precautions**
– Always wear protective gear such as gloves and goggles.
– Ensure the vehicle is securely lifted and supported before working underneath.

– **Consult Repair Manual**
– Refer to the specific repair manual for Opel Astra Family for detailed specifications and torque settings during the repair.

– **Professional Help**
– If unsure about any steps or if the damage appears severe, consider consulting a professional mechanic for assistance.
The rearview mirror is a critical component of a vehicle’s interior, designed to provide the driver with a clear view of the road behind them. Typically mounted at the top center of the windshield, this mirror serves multiple functions that enhance both safety and convenience while driving.

Primarily, the rearview mirror allows the driver to monitor traffic conditions behind the vehicle, facilitating safer lane changes and merging. It helps the driver maintain awareness of vehicles approaching from the rear, which is essential for avoiding potential accidents. Many modern vehicles also incorporate features such as auto-dimming capabilities, which automatically reduce glare from headlights of following vehicles at night, enhancing visibility and comfort.

In addition to its basic reflective function, some rearview mirrors integrate advanced technologies, such as built-in displays for backup cameras, navigation systems, and Bluetooth connectivity. These multifunctional mirrors can provide real-time information such as speed, directions, and even notifications from mobile devices, thereby minimizing distractions and promoting safer driving habits.

Moreover, the design of rearview mirrors has evolved over the years, with options like wide-angle mirrors that increase the field of vision, reducing blind spots. In summary, the rearview mirror is not just a simple reflective surface; it is a multifaceted device that plays an essential role in vehicle safety and driver convenience.

Download VAUXHALL OPEL CORSAService & Repair Manual 2000-2004 –

book shop
Replacing the anti-roll bar (also known as a stabilizer bar) on a Vauxhall Opel Corsa involves several steps and requires a good understanding of automotive mechanics. click here for more details on the download manual…..


    How to change a front shock strut on OPEL CORSA D [TUTORIAL AUTODOC] How to change a front shock strut on OPEL CORSA D 4 (L08, L68) 1.3 Hatchback 2006–2014 [TUTORIAL AUTODOC] …

    Changing front Brake Pads and Discs Vauxhall Corsa D Changing the brake pads and brake discs on the Vauxhall Opel Corsa D.

Below is a detailed guide on how to perform this replacement. Please ensure you have the necessary tools and safety equipment before you start.

### Tools and Equipment Needed:
1. **Safety Equipment:**
– Safety goggles
– Gloves
– Steel-toed boots

2. **Tools:**
– Jack and jack stands
– Wheel chocks
– Socket set (metric)
– Wrenches (metric)
– Torque wrench
– Pry bar
– Hammer
– Pliers
– Screwdrivers
– A bungee cord or rope (to support suspension components if needed)

3. **Replacement Parts:**
– New anti-roll bar (ensure it’s the correct part for your specific model)
– New anti-roll bar bushes (often included with the bar, but check)
– New end links (if applicable)

### Step-by-Step Replacement Process:

#### 1. Preparation:
– **Safety First:** Park your vehicle on a flat surface, engage the handbrake, and place wheel chocks behind the rear wheels to prevent movement.
– **Gather Tools:** Have all your tools and replacement parts ready.

#### 2. Lift the Vehicle:
– **Loosen Lug Nuts:** Using a lug wrench, slightly loosen the lug nuts on the front wheels but do not remove them completely.
– **Jack Up the Vehicle:** Use a hydraulic jack to lift the front of the vehicle and place jack stands under the appropriate jacking points for added safety.
– **Remove Front Wheels:** Once the vehicle is secure, remove the lug nuts completely and take off the front wheels.

#### 3. Locate the Anti-Roll Bar:
– The anti-roll bar is a long metal bar that runs across the vehicle, connecting the left and right suspension components. It is typically mounted to the chassis with rubber bushings and may have end links connecting it to the lower control arms.

#### 4. remove the End Links:
– **Identify End Links:** These are the vertical connections between the anti-roll bar and suspension arms.
– **Disconnect End Links:** Use a wrench to remove the bolts securing the end links to the anti-roll bar and the suspension components. You may need to hold the end link with pliers to prevent it from spinning while you remove the nut.

#### 5. remove the Anti-Roll Bar from Mounts:
– **Locate Mounting Bolts:** Find the bolts that secure the anti-roll bar to the chassis. There will typically be two brackets with bolts on each side of the bar.
– **Remove Bolts:** Use a socket and ratchet to remove these bolts. If the bolts are rusted or stuck, you may need to apply penetrating oil and let it sit for a few minutes.
– **Remove the Anti-Roll Bar:** Once all bolts are removed, you can carefully slide the anti-roll bar out of its mounts. Be cautious of any wiring or components that might be in the way.

#### 6. Install the New Anti-Roll Bar:
– **Position the New Bar:** Align the new anti-roll bar in the same position as the old one. If it comes with new bushings, make sure to install them as well.
– **Secure the Bar:** Insert the anti-roll bar into the mountsdownload VAUXHALL OPEL CORSA workshop manual and hand-tighten the bolts. Make sure the bar is aligned properly.
– **Torque the Bolts:** Use a torque wrench to tighten the mounting bolts to the manufacturer’s specifications (check the service manual for the correct torque settings).

#### 7. Reattach End Links:
– **Install New End Links:** If you have new end links, install them at this time. Attach one end to the anti-roll bar and the other to the suspension arm.
– **Tighten End Link Bolts:** Ensure they are secured properly and torque them to the specified settings.

#### 8. Reinstall Wheels:
– **Replace Front Wheels:** Place the front wheels back on and hand-tighten the lug nuts.
– **Lower the Vehicle:** Carefully lower the vehicle back to the ground using the hydraulic jack. Once it’s on the ground, use a torque wrench to tighten the lug nuts to the specified torque setting.

#### 9. Final Checks:
– **Inspect the Installation:** Ensure that everything is properly secured and that there are no loose components.
– **Test Drive:** Take the vehicle for a test drive to ensure that the handling feels correct and that there are no unusual noises.

### Conclusion:
Replacing the anti-roll bar on a Vauxhall Opel Corsa is a manageable task for someone with Basic mechanical skills. Always refer to your vehicle’s service manual for specific torque settings and detailed diagrams. If you’re uncertain at any point, consider consulting a professional mechanic to assist with the replacement.
Wheel alignment refers to the adjustment of a vehicle’s suspension system, which connects the car to its wheels. Proper alignment ensures that the wheels are positioned correctly relative to each other and to the road, which is crucial for optimal vehicle performance. The primary parameters involved in wheel alignment include camber, caster, and toe angles.

Camber measures the tilt of the wheels in relation to the vertical axis. If the tops of the wheels lean outward, it’s called positive camber, while inward tilt is negative camber. Both extremes can lead to uneven tire wear and affect handling. Caster measures the angle of the steering axis, which can impact steering stability and returnability. Positive caster enhances straight-line stability, while negative caster can make a vehicle feel unstable.

Toe refers to the direction the tires point relative to the centerline of the vehicle. If the front of the tires is closer together than the rear, it is known as toe-in; if the rear is closer, it’s toe-out. Improper toe alignment can cause tires to wear unevenly and can affect the car’s responsiveness.

Regular wheel alignment checks are essential for maintaining tire life, improving fuel efficiency, and ensuring safe handling. Misalignment can result from various factors, such as hitting potholes or curbs, and may require professional adjustment to restore proper vehicle dynamics.