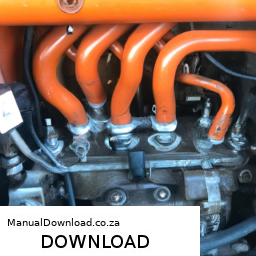
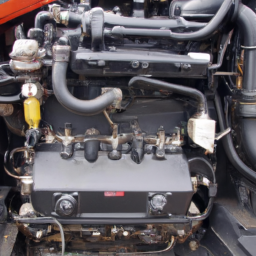
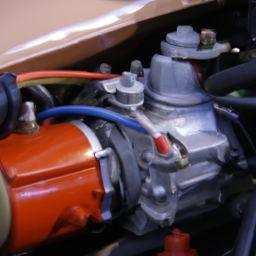
Clutch plate replacement on a Kubota D1803 M DI engine involves several steps, tools, and precautions. click here for more details on the download manual…..
- Smoking Kubota diesel engine in Altec DC1317 chipper (clogged muffler) https://bauertree.com/chippers/ So we had this Kubota V3600T pump smoke like a coal burning chu chu train. Fuel injection guys …
- Motore Kubota D1803 M EU1 BIONDI RICAMBI SRL Motore Kubota D 1803 M New original Kubota brand!!
Below is a detailed guide that outlines each aspect of the process.
### Tools and Equipment Needed
– **Basic Hand Tools**
– **Socket Set:** standard and metric sizes to remove bolts and nuts.
– **Wrenches:** Open-end and box-end wrenches for various fastenings.
– **Screwdrivers:** Flathead and Phillips for miscellaneous screws.
– **Specialized Tools**
– **Clutch Alignment Tool:** Essential for aligning the new clutch plate with the flywheel and pressure plate.
– **Torque Wrench:** To ensure bolts are tightened to the manufacturer’s specifications.
– **Pry Bar:** Useful for separating parts that may be stuck.
– **Safety Equipment**
– **Safety Glasses:** Protect eyes from debris.
– **Gloves:** Provide grip and protect hands from sharp edges.
– **Replacement Parts**
– **Clutch Plate Kit:** Includes the clutch disc, pressure plate, and release bearing (if applicable).
– **Gaskets and Seals:** To prevent leaks after reassembly.
– **Cleaning Supplies**
– **Degreaser:** For cleaning the flywheel and surrounding components.
– **Rags/Paper Towels:** For wiping down parts and cleaning surfaces.
### Preparation
– **Safety First:** Disconnect the battery to prevent any electrical issues while working.
– **Lift the Machine:** Use a jack or lift to elevate the engine/transmission area safely. Ensure it’s stable.
– **Remove Protective Covers:** Take off any covers or shields that might obstruct access to the clutch assembly.
### Disassembly Steps
– **Remove the Transmission:**
– Disconnect the drive shaft or any linkages connected to the transmission.
– Support the transmission with a jack and remove the mounting bolts.
– Carefully slide the transmission away from the engine.
– **Access the Clutch Assembly:**
– Once the transmission is removed, locate the clutch assembly.
– Take note of the arrangement for reassembly.
– **Remove the Clutch Assembly:**
– Unbolt the pressure plate from the flywheel using a socket set.
– Carefully detach the pressure plate, ensuring to keep track of any shims or spacers.
– Remove the old clutch disc from the flywheel.
### Inspection
– **Inspect Flywheel:** Check for wear, cracks, or damage. Resurfacing may be necessary if it shows significant wear.
– **Check Pressure Plate:** Look for signs of warping or damage; replace if needed.
– **Inspect Release Bearing:** Ensure it rotates smoothly; replace if any noise or roughness is detected.
### Installation Steps
– **Clean Surfaces:**
– Use degreaser to clean the flywheel and pressure plate mounting surfaces thoroughly.
– Wipe down the clutch disc and ensure no debris is present.
– **Install New Clutch Plate:**
– Position the new clutch disc onto the flywheel, aligning it with the pilot bearing.
– Use the clutch alignment tool to ensure proper centering.
– **Attach Pressure Plate:**
– Position the new pressure plate over the clutch disc.
– Install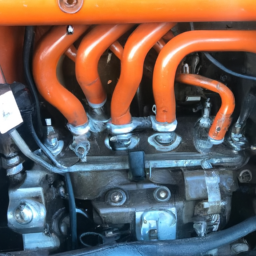 and hand-tighten the bolts in a star pattern to evenly distribute pressure.
– Use a torque wrench to tighten the bolts to the manufacturer’s specifications.
### Reassembly
– **Reattach the Transmission:**
– Carefully slide the transmission back into position.
– Reinstall the mounting bolts and other components (drive shaft, linkages) that were removed.
– **Reconnect Battery:** Once everything is reassembled, reconnect the battery.
### Final Checks
– **Test Clutch Functionality:**
– Before starting the engine, press the clutch pedal several times to ensure it’s functioning correctly.
– Inspect for any unusual noises or issues when the engine is started.
– **Check for Leaks:** After everything is put back together, inspect for any fluid leaks around the transmission and engine.
### Conclusion
Replacing the clutch plate on a Kubota D1803 M DI engine requires careful attention to detail and adherence to safety protocols. Proper tools and a methodical approach will ensure the job is done correctly, enhancing the engine’s performance and longevity. Always refer to the manufacturer’s service manual for specific torque specs and procedures related to your particular model.
The fog light switch is a crucial component in a vehicle’s lighting system, designed to control the fog lights, which are specialized lights mounted low on the front of a vehicle. These lights provide enhanced visibility in adverse weather conditions such as fog, rain, or snow, where traditional headlights may struggle to illuminate the road effectively due to light scattering. The fog light switch allows the driver to activate or deactivate these lights as needed, ensuring optimal visibility while minimizing glare for other drivers.
Typically located on the vehicle’s dashboard or integrated into the headlight control stalk, the fog light switch is often labeled with a symbol that resembles a light beam with a wavy line beneath it, indicating the dispersion of light. Depending on the vehicle’s design, the switch may be a simple toggle, a push-button, or a rotary dial that also controls other lighting functions.
In many modern vehicles, the fog light switch may be part of a more extensive lighting control system, which can include automatic features that turn fog lights on or off based on ambient lighting conditions. Proper use of fog lights is essential; they should only be used in low visibility situations, as their bright beams can blind oncoming traffic when used in clear conditions. Thus, the fog light switch plays a vital role in enhancing driving safety and comfort during challenging weather scenarios.

 and secure it with screws or bolts, tightening them to the manufacturer’s specifications using a torque wrench.
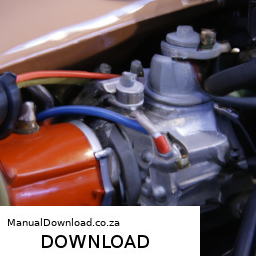
 and torque specifications.
 and secure.