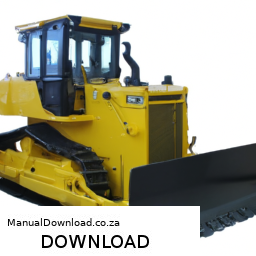
Repairing the torque converter clutch on a Komatsu D65E-12, D65P-12, D65EX-12, or D65PX-12 bulldozer involves several steps and requires specific tools and equipment. click here for more details on the download manual…..
- Blower Motor ND292500 0140 ND2925000140 for Komatsu PC1250 7 PC1250LC 7 D155A 3 D41E 6 D61E 12 D6… https://www.yearnparts.com/blower-motor-nd292500-0140-nd2925000140-for-komatsu-pc1250-7-pc1250lc-7-d155a-3-d41e-6- …
Here’s a detailed breakdown of the process, along with a list of necessary tools:
### Tools and Equipment Needed
– **Service Manual**
– Essential for specifications, torque values, and detailed procedures specific to the Komatsu D65 series.
– **Basic Hand Tools**
– **Socket Set**: Metric sockets (10mm to 30mm) for various bolts and nuts.
– **Wrenches**: Open-end and adjustable wrenches for different sizes of bolts.
– **Screwdrivers**: Flathead and Phillips for various components.
– **Torque Wrench**
– Used to ensure bolts are tightened to the manufacturer’s specifications.
– **Pry Bar**
– Useful for removing tightly fitted components without damaging them.
– **Pneumatic or Electric Impact Wrench**
– Speeds up the removal and installation of bolts, especially in tight spaces.
– **Seal Puller**
– Allows for the safe removal of seals without damaging the surrounding components.
– **Oil Catch Pan**
– To catch any fluid that may leak during the repair process.
– **Cleaning Supplies**
– **Degreaser**: For cleaning surfaces before reassembly.
– **Rags and Brushes**: For wiping down components and cleaning.
– **Gasket Scraper**
– To remove old gasket material from surfaces.
– **Replacement Seals and Gaskets**
– ensure you have the correct parts as specified in the service manual.
### Repair Process
– **Preparation**
– ensure the bulldozer is parked on a flat surface, and the engine is turned off.
– Disconnect the battery to prevent any electrical issues during repair.
– Remove the necessary covers and guards to access the torque converter assembly.
– **Drain Fluids**
– Use an oil catch pan to drain the hydraulic fluid from the torque converter.
– Remove the drain plug and let all fluid escape.
– **Remove Torque Converter**
– Detach the bolts securing the torque converter to the engine flywheel.
– Use a pry bar if necessary to help break the torque converter loose.
– Carefully pull the torque converter away from the engine, ensuring not to damage any attached components.
– **Disassemble the Torque Converter**
– Once removed, place the torque converter on a clean workbench.
– Remove the cover by unscrewing the bolts that hold it in place.
– Carefully detach the internal components, paying attention to how they are arranged.
– **Inspect Components**
– Check the clutch plates, springs, and other internal components for wear or damage.
– Measure the thickness of the clutch plates; if they are below the manufacturer’s specifications, they should be replaced.
– **Replace Seals and Gaskets**
– Use a seal puller to remove old seals from the torque converter.
– clean the surfaces thoroughly with a degreaser and a rag.
– Install new seals and gaskets, ensuring they are seated properly.
– **Reassemble the Torque Converter**
– Reinstall the internal components in the reverse order of disassembly.
– Replace any worn or damaged parts as needed.
– Secure the cover back onto the torque converter using a torque wrench to tighten the bolts to the specified torque from the service manual.
– **Reinstall Torque Converter**
– Carefully align the torque converter with the engine and push it back into place.
– Reattach the bolts securing the torque converter to the flywheel.
– **Refill Fluids**
– Reinstall the drain plug and refill the hydraulic system with the appropriate type and amount of fluid as specified in the service manual.
– **Reconnect battery and Test**
– Reconnect the battery and start the bulldozer.
– Monitor the operation of the torque converter clutch to ensure it engages and disengages correctly.
– **Final Checks**
– inspect for any leaks around the torque converter.
– Conduct a test drive to ensure everything is functioning as expected.
This process requires a good understanding of the machinery and proper safety precautions. Always refer to the service manual for specific instructions and torque specifications.
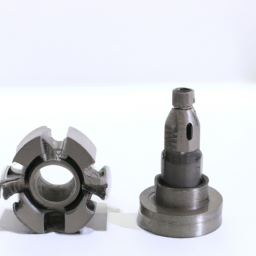
A piston is a crucial component of an internal combustion engine, playing a key role in the engine’s operation and overall efficiency. It is typically a cylindrical piece of metal that fits snugly within the engine’s cylinder. The primary function of the piston is to convert the energy produced from the combustion of fuel and air into mechanical energy, which ultimately powers the vehicle.
When the fuel-air mixture ignites within the combustion chamber, it creates high-pressure gases that push the piston downward. This movement is known as the power stroke, and it is one of the four stages of the four-stroke engine cycle: intake, compression, power, and exhaust. As the piston moves down, it turns the crankshaft, which then translates this linear motion into rotational motion to power the vehicle’s wheels.
Pistons are designed to withstand extreme temperatures and pressures, which is why they are typically made from durable materials like aluminum alloys or cast iron. They also feature rings—known as piston rings—that help create a seal between the piston and the cylinder wall, preventing the escape of combustion gases and maintaining efficient engine performance.
Additionally, maintaining the proper clearance between the piston and the cylinder wall is crucial for optimal functioning, as excessive wear can lead to decreased engine efficiency and increased oil consumption. Overall, the piston is an integral part of an engine’s design, influencing its power output, efficiency, and longevity.

 tands before working underneath it.
 and Preload:**
 and safety glasses to protect yourself during the installation.
 and procedures.
 tands and
 Hand-tighten the bolts in a crisscross pattern to ensure even pressure.
 and look to see if the belt
 and tighten it securely.